WELCOME!


WELCOME TO LIFE IN FLIP-FLOPS! Click Here To Visit: MY WEBSITE

To easily read my blog and not miss a post--SUBSCRIBE VIA E-MAIL

You can always comment using the "ANONYMOUS BUTTON."

Or just CLICK ON ONE OF THE LITTLE SQUARES at the bottom of my posts to let me know what you think. Easy-Peasy!

And Don't Forget To FEED MY FISH!!!! (at the bottom of the side column)

Thursday, October 28, 2010

More Than Wiggles and Waves—Part 2


Aloha!

As promised, I am going to tell you about some instruments I used during my time dancing the hula.

The Pu’ili is a split bamboo instrument. You grip the solid end and bang the split ends together (crisscross in front of you) with each beat of the music. Sometimes the story being told calls for you to hit them above your head, to the side, or down low. They are used for sit-down hulas as well as standing hulas, and by men as well as women. Over time, the splits in this instrument can relax and become too wide, making a different sound, and the Pu’ili not look exactly right. I stored mine with a rubber band around the ends or something tied around the ends to keep the splits tight.

The ‘Ili’ili are Hawaiian castanets—four smooth, equal sized rocks that can be held easily, two per hand. These are challenging to hold, and even more so to click as you dance! And, you still have to move your hands and arms into various positions to tell the story. I found ‘Ili’ilis for sale on the internet for around $20 per set. Hmm . . . I just dug around outside and found four flat, equal sized rocks—worked for me!

I don’t own an Ipu. It is a hula percussion instrument—a gourd held in one hand and hit with the other for rhythm. The gourd is given a glossy finish and will have a different sound depending on its size and thickness.

The ‘Uli’Uli is a feathered gourd rattle. You use them in a set of two—one in each hand. I don’t own a set of ‘Uli’ulis. They are used by both men and women. You usually see these in the fast-paced Tahitian dancing.

Hope you enjoyed learning about the instruments I used when dancing. Now, go outside, find four rocks, and try your hand at Hawaiian castanets!

Mahalo for visiting, and I’d love to hear your comments (or check a box below!)
Cheryl

Monday, October 25, 2010

More Than Wiggles and Waves


Aloha!

Ever danced the hula??

Did you wiggle your hips and wag your hands? That’s what you usually see when someone tries the hula.

But, the hula is all about foot and leg-work to get those hips to more right. With your knees bent and small steps, side to side, you work your hips into a rhythm. It’s a lot of work, but looks amazingly smooth and beautiful.

Now, the hand movements are a bit hard for me to explain. It’s definitely NOT a wave. It’s like you’re extending your fingers to pick a small flower between your thumb and middle finger, then pull the fingers and hand back, combined with a bend at the wrist. Okay—everyone try that!

Of course there are the added hand and arm movements that tell a story. There are also additional feet movements. But, seriously, let’s just try the basic movement! Stand up, everyone—bend those knees and take small steps, pushing the hips into rhythm. Now add the “plucking” fingers/hands. Cool! Sorry, can’t see you, but I bet you’ve got it!

I took Hawaiian Dance while at the University of Hawaii. Absolutely loved it! Since that time I have performed the hula (even at my own wedding) and taught classes for kids. Once I even performed on stage at a large mall in Portland. Haven’t done it for a while, and don’t remember the movements to the various dances. Hmm . . . maybe I should find some classes to attend!

Come back on Thursday to learn more about the instruments I used while dancing! You’ll find them fascinating!

Mahalo for visiting, and I’d love to hear your comments (or check a box below!)
Cheryl

Thursday, October 21, 2010

How Does Your Garden Grow?


On Monday I talked a little about the Hawaiian Volcanoes. Now that the islands have been formed, how did vegetation show up?

Thanks to birds!

Birds would carry seeds in their feathers and some stuck on their legs. They would also eat seeds, so when they made shishi (I’m sure you can figure out the meaning of this word!) the seeds grew. Grasses, trees, fruits and flowers thrived on the islands.

And how did the birds get way out there in the middle of nowhere? Strong winds are the probable cause. They blew birds off course. Winds also brought insects, butterflies and bees to the islands.

Floating logs and debris also could have brought seeds, geckos, and gecko eggs to the islands.

Combine this together and you have the lush tropical landscape of Hawaii.

Sands formed by volcanoes and ocean waves eroding away. Palm trees, mangos, papayas, and plumerias arriving with the birds. Makes me want to slip on my flip-flops and find a warm beach somewhere!

Thanks for visiting! Please visit again every Monday and Thursday, and don't forget to check one of the little boxes below or leave a comment.

Aloha!
Cheryl

Monday, October 18, 2010

Cinder, Composite, Shield or Lava Dome?

When geologists group volcanoes, it’s usually into four main kinds.

The Hawaiian islands are made up of shield volcanoes.

You may hear a variety of terms used when people talk about volcanoes. What’s the difference between the terms? Here are a few definitions that may help you.

Caldera—The large basin-shaped depression formed when the roof of the magma chamber collapses because massive amounts of magma have erupted. Some are formed when a huge explosion removes the upper part of the volcano.

Crater—A depression around the orifice of a volcano.

Magma—Molten rock within the earth’s crust that is capable of extrusion onto the surface.

Lava—Molten rock that has extruded onto the surface.

Lava Tube—A tunnel formed under a lava flow.

Pahoehoe—As the lava flows along the tube, a top crust will form. As the lava flows underneath, the top begins to wrinkle. This is pahoehoe.

Aa—Sometimes the pahoehoe will shift as it cools and loses gas, forming sharp edges and spiny projections.

If you would like to see some photos of pahoehoe and aa flows, or would like to read more about the Hawaiian volcanoes, here is a site to visit.


Thank you for visiting. Please visit again on Thursday and don't forget to check a box below or leave a comment!
Aloha!
Cheryl

Thursday, October 14, 2010

Flowers, Leaves, and Nuts


Aloha!

When you picture someone wearing a Hawaiian Lei, you probably see colorful flowers. And worn by a female (Wahine).

But did you know they make leis out of leaves and nuts, too? And, men (Kane) in Hawaii wear leis, too, usually Kukui Nut, Maile, or Ti Leaf.

In my books, Leilani's favorite type is a pink plumeria lei.

These are some of the more popular styles:

Plumeria (or Melia) Lei—The plumeria is a flower which grows on trees. Very popular choice and comes in many colors such as yellow, white, orange, variegated, and pink.

Maile Lei—Very fragrant leaves worn by men and women. Some are made with an added twist of white orchids. These leis are given at graduations, weddings (the bride, groom, and wedding party), anniversaries, and other celebrations where a person is honored. Thought to be the first plant used for leis in Hawaiian history.

Awapuhi Lei—Made from ginger plants.

Kukui Nut Lei—made from the kukui nut. Comes in black and white, and generally worn by men.

Ti Leaf—Another lei worn by men. The leaves can be woven and braided and sometimes interlaced with orchids (see Okika Lei below.)

Okika Lei—Made from orchids. The dendrobium orchids are known for their durability and longevity. Orchid leis can be found as a single strand, double, and sometimes interlaced with ti leaves.

Tuberose Lei—This is an amazingly fragrant lei. The tuberose flower keeps its scent much longer than others.

Keiki Lei—a child’s lei, generally made of candy.

Mahalo for visiting!
Cheryl

Monday, October 11, 2010

One, Two, Buckle Your Shoe . . .


Three, Four, Piled By The Door!

When I first arrived in Hawaii at age 19, I had a friend from The University of Oregon (Go Ducks!!!—sorry, couldn’t resist) who took me around and introduced me to several interesting places around Oahu, and to many family members and friends.

I was surprised when I walked into a house one day and saw a pile of shoes at the entry.

What are all these shoes doing here? Are they going to have a sale or something? Maybe they’re for Goodwill.

Then I noticed no one was wearing shoes (except yours truly—the total mainlander!) Finally my friend said, “Cheryl, take off your shoes!” I was totally embarrassed. But, honestly, I didn’t know what was proper for me to do. I’d never gone barefoot indoors in Oregon. Your poor feet would freeze to death in Oregon weather!

I came back to Oregon in the summer, so I naturally took off my shoes, and left them at the entry. A few minutes later, my mom marched into my room, shoes in tow, and tossed them on my floor. Hmm . . . don’t think she appreciated the whole “piles of shoes by the entry” thing!

Now when I go to my niece’s house—guess what?? I see the familiar pile of shoes when I enter the house. Now, it's easy to slip flip-flops on and off during the summer, but boots and shoes in the winter??? And then my poor feet turn into little popscicles!

Sigh . . . guess I'd better wear extra thick socks!

Aloha!
Cheryl

Thursday, October 7, 2010

You Don't Have To Dig Up Your Yard!

Cook kalua pig in your oven!


Kalua Pig (Oven Style)

If you have a Traeger Grill, you can also use it. That's what I did. I followed the recipe but didn't add liquid smoke and didn't put the banana-leaf-wrapped pork into a turkey roasting bag. I did place it in a disposable baking pan. I cooked it for 10 hours, the last hour on smoke. I'm thinking next time about smoking it the last 2 hours and possibly opening up the banana leaves. I also wrapped more banana leaves around the pork to help keep it moister. The pork turned out great! My family and a guest loved it. Served it with King's Hawaiian Sweet Bread and a homemade coleslaw. Fabulous!


Ingredients

-1 5-6 LB. Pork Butt, bone in
-5-6 Tbsp. Hawaiian Rock Salt (I usually go by the 1 Tbsp. salt to every pound of pork method)
-Banana Leaves (I have found them in the frozen isle at Fubonn Market. Make sure the leaves are defrosted and are wiped down with a wet towel before use.)
-Kitchen Twine
-2 Tsp. Liquid Smoke
-Turkey Oven Bags

Instructions

-Preheat oven to 250 degrees Farenheit
-Lay two clean banana leaves in the shape of a plus sign
-Place pork butt in the cross section of the banana leaves and rub the Hawaiian Rock Salt generously all over the pork. Even if you think it’s too much, trust me, it’s not.
-Add the liquid smoke over the pork butt
-Wrap the pork with the banana leaves and tie the kitchen twine around the entire package just to make sure that the leaves will stay in place.
-Place the package of pork into the turkey oven bag and close with the tie that comes with the bag
-Bake overnight for at least 8-10 hours
-Take pork out and let cool before shredding. Make sure to keep all of the juices from the pork so that the pork stays moist and juicy!

Monday, October 4, 2010

Pretty in Pink!

You’ve been asking, so here it is—my adventure making Guava Cake!

The memory of first tasting this cake is still so vivid to me. I remember having it as a special celebration. One time for Girls’ Day, our guy friends in my dorm bought a guava cake for a group of us girls. It was so good and we had such fun. I will do a post on both the Girls’ Day and Boys’ Day celebrations in Hawaii when those dates get near.

So, my guava cake baking adventure began with a trip to an Asian market to purchase guava and guava nectar. I bought a can of guava, but then found some huge, fresh guavas, which had just arrived from Hawaii. It was fun to make the cakes with fresh guava, but let me warn you—they were mighty expensive!

I used two different recipes and then made a third cake using some “tweaks” of my own.

CAKE NUMBER ONE is basically a spice cake. My family liked it, but I would describe it to be like an applesauce spice cake—not the traditional guava cake I remember. I don’t care for strong clove flavors, so I left out the cloves.

Unique Guava Cake (Spice)

2 cups white sugar
1 cup butter
4 eggs
1 cup guava pulp (I used fresh, but canned is way less expensive! I puréed the guava with some of the nectar. When done, remember to measure a total of 1 ½  cups of combined nectar and pulp.)
½ cup guava nectar
3 cups flour
1 tsp ground nutmeg
1 ¼ tsps baking soda
¼ tsp ground cloves (I left this out)
¼ tsp ground cinnamon

Preheat oven to 350 degrees. Grease and flour one 13 X 9 inch pan.
Sift together flour, nutmeg, soda, cinnamon, and cloves.
In another bowl, mix together guava pulp and juice.
In another bowl, cream butter and sugar. Add eggs, one at a time. Add flour mixture and guava mixture alternately to creamed mixture. Pour batter into prepared pan.
Bake at 350 degrees for 30-35 minutes. (I used my smaller oven. It was done after about 27 minutes. I suggest checking after 25 minutes and testing with a toothpick. It will also cook more quickly if using convection.)

I served the cake topped with real whipped cream.


CAKE NUMBER TWO is a fancy and rich guava cake you might see for a birthday celebration. Again, I puréed fresh guava with the nectar. This is a very simple recipe that uses a cake mix as its base. Very yummy and rich!

Easy Guava Cake

1 pkg. white, yellow, or strawberry cake mix (I used white. I think the strawberry would make it taste different. To get the cake more pink, add red food coloring to your nectar/purée mix)
1 1/3 c guava juice (I prefer nectar, as it is a little thicker, and I added some purée as well.)
3 eggs
1/3 c vegetable oil (I used 1/3 c more purée in place of the oil)
Filling:
1 8-ounce package cream cheese, softened
1/3 cup sugar
1 tsp vanilla
1 small package Cool Whip (I whipped up the real stuff)
Glaze:
2 c guava juice (or nectar)
½ cup sugar
¼ c cornstarch

Bake cake (in two round cake pans) according to package directions, substituting guava juice/nectar/purée for the water (and for the oil as I did)
Beat cream cheese with hand mixer until fluffy. Add sugar and vanilla and beat in. Slowly fold in the whipped cream and refrigerate until ready to use.
In a medium sauce pan, bring the 2 cups juice/nectar and sugar to a boil.
Make a paste (not too thick—keep it runny) out of the cornstarch and a small amount of water.
Remove guava juice from heat and stir in the cornstarch paste. (Warning! I’d let the guava cool a moment and slowly add paste while rapidly stirring the guava. If you get lumps, you can strain and/or spoon out later)
Return to heat and bring back to a boil (I kept stirring) for about 1 minute.
Cool glaze in refrigerator.
Assemble cake with filling between layers and glaze over the top. (I let the glaze dribble over the sides.)


Easy Guava Cake (Cheryl's Version)

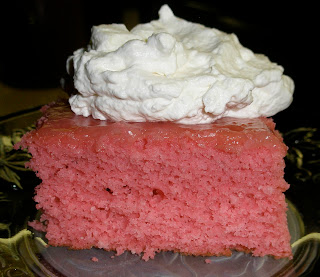
CAKE NUMBER THREE is the cake above, baked in a 9 X 13 pan with no filling, but I did put the glaze on top. I also added red food coloring to my guava nectar/purée mixture to create a more pink color to the cake. I also substituted extra purée for the oil. Then I served it with real whipped cream. This one was definitely our favorite!!

Happy Baking!
Cheryl